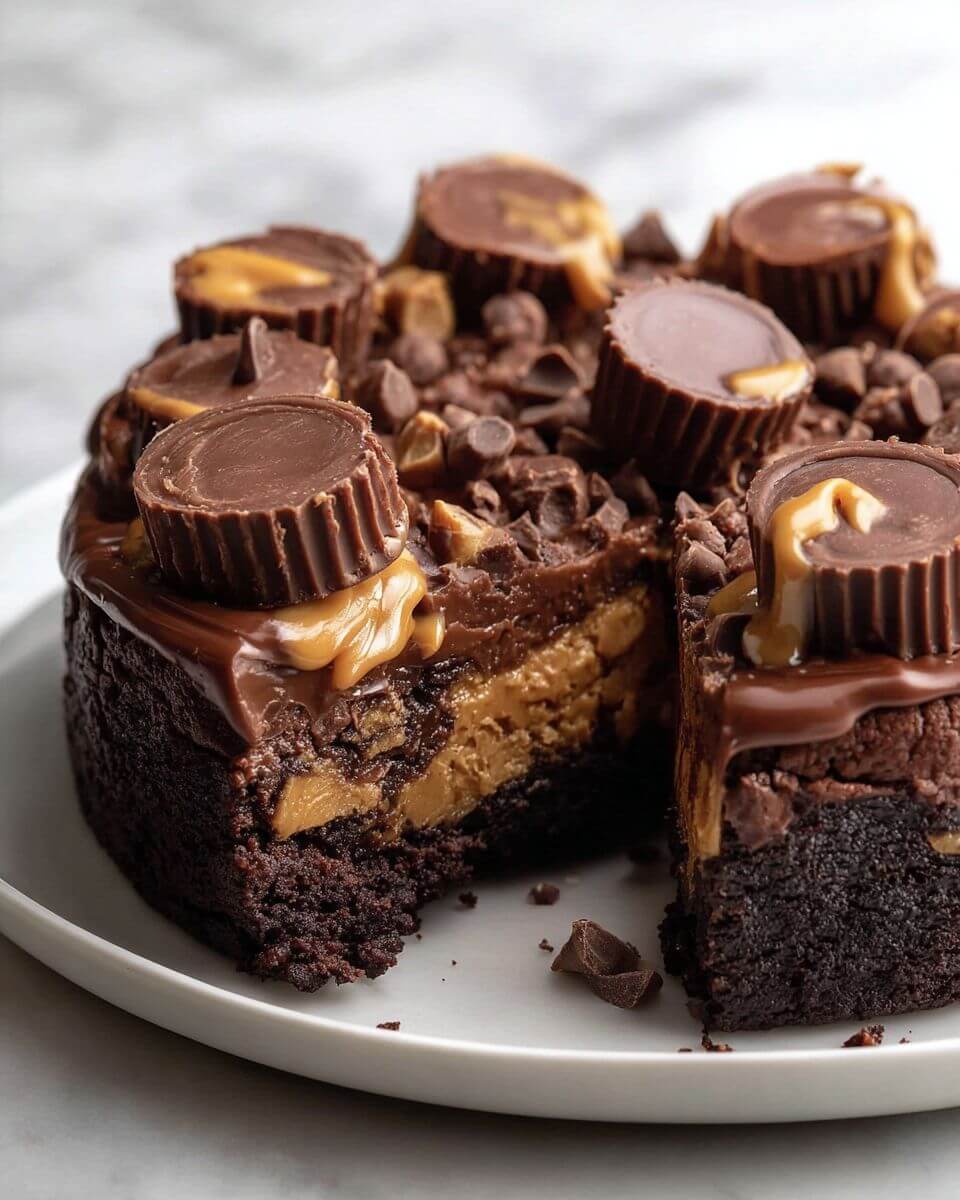
Reese’s Chocolate Peanut Butter Cup Earthquake Cake
Reese’s Chocolate Peanut Butter Cup Earthquake Cake (The Dessert That Never Lasts Long)
Why Reese’s Earthquake Cake is a guaranteed crowd-pleaser
There are desserts people politely try… and then there are desserts people hunt down seconds for.
This is the second kind.
Reese’s Chocolate Peanut Butter Cup Earthquake Cake is rich, messy in the best way, and unapologetically indulgent. It’s the kind of dessert that makes you pause after the first bite—not because it’s subtle, but because it’s so much (in a good way).
And for moms juggling busy schedules, school pickups, and “what’s for dinner?” on repeat, this cake is a small win. It looks impressive. It tastes bakery-level. But it starts with a box mix and a handful of pantry staples.
Honestly? That’s the sweet spot.
What makes an “earthquake cake” special (gooey layers + texture contrast)
Let me explain the name real quick—because yes, it sounds dramatic.
An earthquake cake gets its name from what happens in the oven. As it bakes, the layers shift and crack, creating uneven ripples, pockets, and swirls. It’s not meant to look perfect. In fact, the more “messy” it looks, the better.
You end up with:
- A soft chocolate cake base
- A rich, creamy peanut butter cheesecake-like layer
- Melted chocolate chips
- Gooey pockets of Reese’s
It’s part cake, part brownie, part molten dessert situation.
And that contrast? That’s what keeps every bite interesting.
Ingredient notes + easy upgrades
This ingredient list is simple, but it builds serious flavor.
- Dark chocolate fudge cake mix: Deep, rich base. You can use any chocolate mix, but darker is better here.
- Cream cheese: Adds tang and structure to balance the sweetness.
- Butter: Richness. Always.
- Peanut butter: Creamy works best for smooth texture.
- Vanilla extract: Rounds everything out.
- Powdered sugar: Thickens the filling into that luscious layer.
- Chocolate chips: Extra pockets of melted chocolate (because why not?).
- Mini Reese’s cups: The star. Sweet, salty, nostalgic.
- Vanilla ice cream: Not optional in spirit, even if technically optional.
Easy upgrades:
- Swap in Reese’s Pieces for a little crunch
- Add a drizzle of chocolate syrup before serving
- Sprinkle a pinch of sea salt on top for contrast
Nothing complicated—just little tweaks if you want to elevate things.

Step-by-step (with timing that makes sense)
This recipe is straightforward, but a few timing details make all the difference.
1. Start with the cake base
Preheat your oven to 350°F and grease a 9×13-inch dish.
Prepare the cake mix according to the box instructions. Whisk until smooth and pour it into the dish.
Take a second to spread it evenly—no need to overthink it.
2. Make the peanut butter cream layer
In another bowl, beat together:
- Cream cheese
- Butter
- Peanut butter
- Vanilla
Once smooth, gradually add powdered sugar.
👉 It should be thick, creamy, and slightly fluffy—almost like frosting, but heavier.
3. Layer it (don’t mix it!)
Spread the peanut butter mixture over the cake batter.
It won’t spread perfectly—and that’s okay. In fact, that’s kind of the point.
Sprinkle chocolate chips and halved Reese’s cups on top. Press them in gently.
4. Bake until set—but still gooey
Bake for 45–50 minutes.
Here’s the key:
You want the edges set and the center slightly soft. A toothpick should come out mostly clean—but not bone dry.
If you overbake, you lose that gooey magic.
5. Cool (at least a little)
Let the cake cool before slicing.
Warm is good. Lava-hot? That’s just chaos.
Baking tips (that perfect gooey center everyone wants)
This is where people either nail it… or accidentally turn it into a regular cake.
A few tips:
- Don’t overbake
Slightly underdone is better than overdone here. - Use room temperature ingredients
It helps everything blend smoothly. - Resist the urge to stir layers together
The separation creates that signature texture. - Check early
Ovens vary. Start checking around 40 minutes.
Think of it like brownies—you’re aiming for that sweet spot between set and soft.
Make-ahead + storage
You can absolutely make this ahead, which is a lifesaver on busy days.
- Bake it earlier in the day and let it cool
- Store covered at room temperature for a few hours
- Refrigerate if keeping longer
When reheating:
- Microwave individual slices for 15–20 seconds
That brings back the gooey texture like magic.
Serving ideas (leftovers included—very important!)
Let’s be honest—this cake is rich. A small slice goes a long way.
But pairing matters.
Best way to serve:
- Warm slice
- Scoop of vanilla ice cream
- Maybe a drizzle of chocolate or caramel
That hot-and-cold contrast? It’s everything.
For gatherings:
- Cut into smaller squares (people will come back anyway)
- Serve on a dessert table with lighter options
Leftovers (if you somehow have them):
- Store in the fridge
- Reheat before serving
- Or… eat cold straight from the container (no judgment)
Some people actually prefer it chilled—it becomes more like a dense fudge cake.
Conclusion
Reese’s Chocolate Peanut Butter Cup Earthquake Cake isn’t trying to be subtle. It’s rich, gooey, chocolate-packed, and a little over-the-top—and that’s exactly why people love it.
It’s the kind of dessert that turns an ordinary day into something a little more fun. The kind that gets requested again before the pan is even empty.
And maybe the best part? It doesn’t demand perfection. Cracks, swirls, uneven layers—that’s where the charm is.
So whether you’re baking for a party, a family night, or just because you’re craving something chocolatey and comforting, this cake delivers.
Every time.
Reese’s Chocolate Peanut Butter Cup Earthquake Cake
Ingredients
Method
- Preheat oven to 350°F (175°C) and grease a 9x13-inch baking dish.
- Prepare the chocolate cake mix according to package instructions. Pour the batter into the prepared baking dish and spread evenly.
- In a bowl, beat cream cheese, butter, peanut butter, and vanilla until smooth. Gradually mix in powdered sugar until thick and creamy.
- Spread the peanut butter mixture over the cake batter. Sprinkle chocolate chips and halved Reese’s cups on top, pressing lightly.
- Bake for 45-50 minutes until set but still slightly gooey in the center. Do not overbake.
- Cool completely before slicing. Serve with vanilla ice cream.
Notes